Following
up from the first build of my tow tractor and luggage cart, this is the
second try. As I explained in that post, the build came out far too
large, compared to what I had wanted to build. This time, I'm going for
pretty much the same project, but in a smaller scale. This should also
mean that I can build more than one luggage cart :)
This is only my third project after returning to Lego Technic after 20
years, so I consider myself a beginner as I have little experience with
studless building. After my last project (RC skid steer) where I had a
lot of headaches fitting everything in, I wanted to build something
simpler for my next project. I picked the Linde P250 as the reference
for this build. The starting goal was not to have an accurate scale
model, but to have a simple remote controlled model that could drive
around. The real one has two versions, a short and long wheelbase. I
picked the long wheelbase version to have more room for internals.
According to the scale I chose, the model was going to end up 13 studs
wide, which looked tight but doable. As I only planned to have driving
and steering, I thought that this should be fine. After picking some
suitable wheels and printing out the blueprint, I started off with the
exterior design, sides and front first.
I was studying pictures and videos of the real thing and this is where I
started to add some things to the original plan. There is a lever in
the cabin that locks and unlocks the trailer coupling. Using this, the
operator can release trailers without getting out of the cabin
and walking around to the back. Also, I saw that this particular model
is available with normal or sliding doors, so I wanted to have the
sliding of course. Finally, the tractor can be "driven" (very slowly)
forwards or backwards from outside using a pair of buttons, again to
make working with trailers easier. I knew that this function was going
to be challenging, due to the limited space available at the back of the
vehicle. There goes the idea of keeping it simple this time...
I started to redesign the sides to have sliding doors. There was a
tricky point with the doors: On the real thing, the door has a piece
which closes the gap between the bottom of the sliding door, and the
cabin floor. If this piece were to be fixed to the door, it would
interfere with the front wheel when the door is slid back. Therefore, it
swings into the door and disappears when the door is slid open. I had
to either make something similar or leave a gap there.
My first version of the sliding doors worked, but had two issues: The
door slid back only 5 studs, which seemed too little and the swing up
piece did not work great. I iterated on this to fix both problems: I replaced the flap with a better shape, and played around with the geometry of how it slides up. Also, I changed the vertical door post and the rail support at the top of the door to be half width linkarms. Now, the door was able to slide 6 studs, and the swing up piece looked good and worked reliably. I did play around with making the door open even wider, but it looked like anything more than 6 studs would mean a lot of other compromises, so I settled on that.
I also worked on the front: The first iteration looked way too narrow, so I moved the headlights outward:
In parallel, I was looking at how to package the internals. I wanted to use the normal AA battery box, but at 11 studs wide, it was challenging to fit. The most efficient way seemed to be to have it in the middle of the chassis, at the bottom. That way, it fit exactly between the side panels, and even protruded half a stud below the chassis, saving space by cheating slightly. In researching the pieces I would need to build this in red, like the original, I realized that some of the thin liftarms I used on the door were not available in red. The issue if I used normal liftarms was that the door would slide just 5 studs. I redesigned the mechanism, to use a normal liftarm for the vertical part of the door, and used a short liftarm (yellow in the picture below) which was able to slide 1 stud under the roof. This way, the door was able to slide 6 studs, and did not need the thin liftarms. I also redesigned the sides, using 5x11 panels at the bottom, which improved both the looks and the structural stability, especially of the battery box mounting.
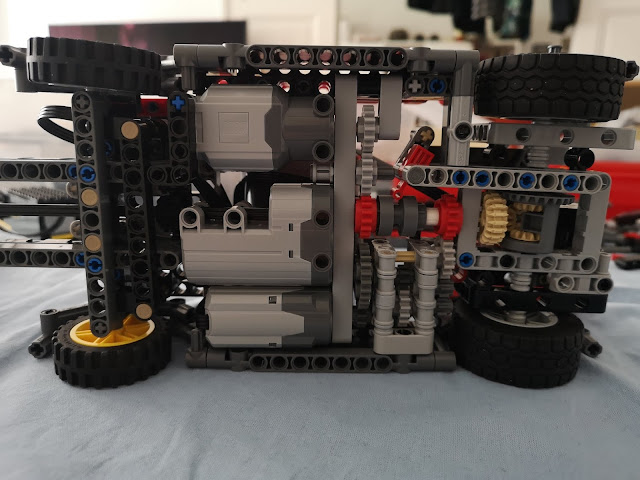
With the exterior starting to come together nicely, next up was to see if I could fit all the functions inside. I wanted to have an L motor for driving and a servo for the steering. For the "driving slowly using buttons on the side of the vehicle" function, I needed an M motor, a clutch to switch the drive to this motor, some gearing down, and a PF switch. I had selected the scale before deciding to add this feature, and it was looking quite unlikely that everything would fit inside.
At this point, I had a choice to make: I could either widen the model or throw out the "button driving" function. As this feature adds a lot to an otherwise mechanically simple model, I wanted to keep it. Increasing the width from 13 to 15 studs was going to improve the packaging immensely. The top part would now be 13 studs wide, so the battery could fit inside the top half. Then all the motors and gears could move below, where I wanted them anyway. I decided to widen the model, to have any chance of fitting in the button driving feature.
The deciding factor for the mechanical layout was the clutch
mechanism to switch between the main motor and the "button drive" motor. I planned to have this just ahead of the differential. I started out with an L motor for the main drive. Due to the space
available, I was not able to fit in any gear reduction, and it ended up
far too fast and jumpy. As there was no available space for any other
gearing, I decided to switch out the L motor with an XL, whose speed is
about half as much as the L. This made the driving much steadier. The
obvious place for the servo was in the middle, and the right side of the
model had the M motor for the "button drive" motor. I started out
trying to hook up the M motor using normal gears. However, it was
difficult to get enough gear reduction in the restricted volume while
still having enough gear reduction. Finally, I tried out a worm gear,
which worked out much simpler and easier.
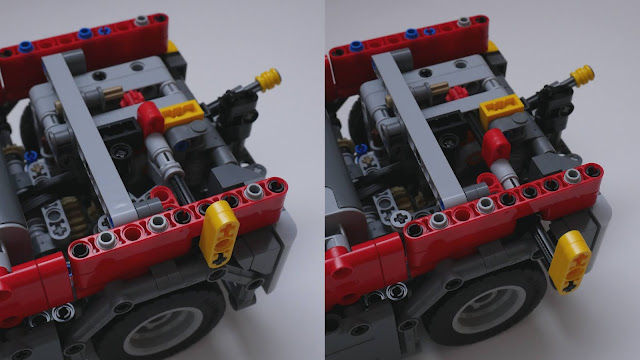
The
way the button drive function works is as follows: The clutch just forward of the
differential takes power from either the L motor or the M motor. The L
motor for normal driving is connected to the IR receiver. The M motor
for the button drive is connected to a PF switch. To activate the "button drive" the yellow liftarm sticking out of the left side towards
the back is pulled out. This switches the clutch to the M motor.
Then,
the liftarm can be tilted back and forth, for driving backwards and
forwards. The red sliding 8t gear engages a 24t gear below, which is
connected to the PF switch below (barely visible in the photos). The two
small 2l red liftarms prevent the tilting when the liftarm is not yet
pulled out to enable the function. I was really happy with how this
feature came out.
The
last feature is the trailer coupling at the back. I made a little
handle which can be used to open or lock the coupling. Also, the
function is forwarded all the way into the cockpit at the front. The lever between the seats actuates the coupling. The linkage had to pass between the differential and the right rear wheel, then between the battery box and the motors, and end up between the front seats. That's why it ended up as this ridiculous looking linkage, but I could not find any simpler shape that would fit in the available space.
After
breathing a sigh of relief that all the functions fit inside, I
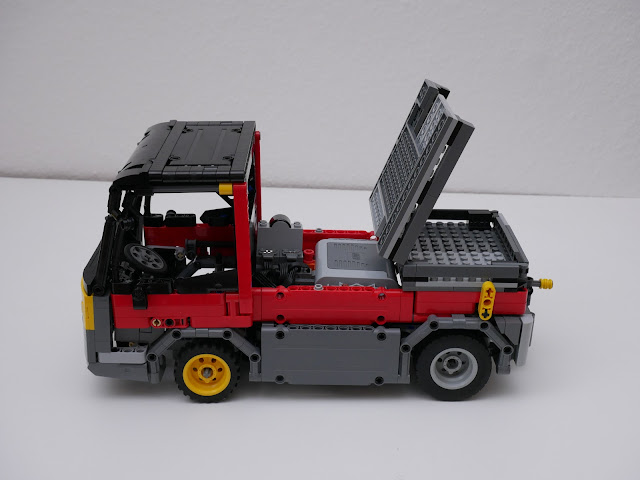
completed some of the exterior details. I added the swing up part of the deck, which
will be used to access the battery box. This is also exactly how it is in the real thing. The battery box went in, and I managed to cram the IR receiver right behind the cabin.
I made some seats and a basic dashboard for the cabin. The only mechanically tricky part here was getting the steering wheel hooked up to the steering mechanism. Initially, I had hooked it up, gearing up from the gear rack to the steering wheel, so that the wheel has more turns, so a bit more realistic. However, this often caused gears to skip,so I went back to two 16 tooth gears. The steering wheel still turns when steering, just not a lot, which is fine. I added seats, made a floor and that was pretty much it.
With the tow tractor finished, I needed some stuff to tow. I started working on a luggage cart. The idea was just a basic luggage cart with flip down side panels. I added a similar trailer coupling as well as I was planning to build two carts. The only tricky part was to make sure that the tow bar wouldn't bind or hit the trailer when taking tight turns. Other than that, it was pretty straightforward. Once the carts were finished, they looked good and worked well. However, I could not help but notice that they felt a bit lonely without any luggage. This is where the project went a bit off the rails. Initially I had wanted to get some Lego suitcases, trunks etc and put them in the carts. They were a bit small, had little variation and to be honest, they just didn't feel right. This is where my better half convinced me to build some luggage myself. Initially I was skeptical that I could put together enough pieces of luggage for both carts, and come up with interesting designs. I tried it out, and it went surprisingly well. Working with the system pieces I had, it was really fun to build different suitcases. Soon thereafter, my better half joined me and together we built enough to fill both carts.
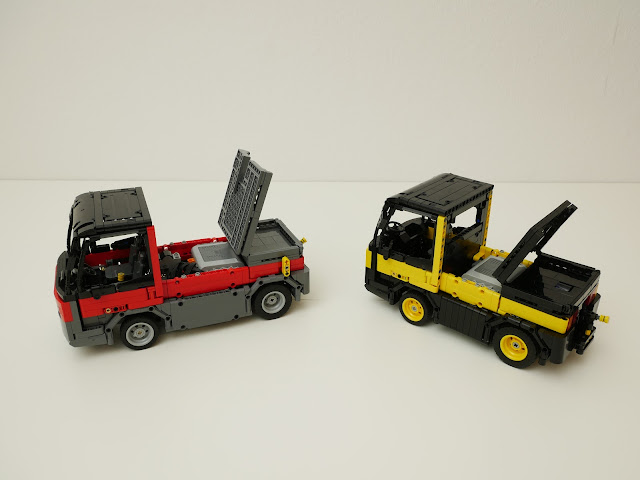
At this point, I wanted to take some pictures, make a video and call this one done. However... I saw the new Lego Technic Jeep Wrangler, and a new part: the 3x7 panel, in yellow. This triggered an idea I had had at the beginning of the project: The Linde P250 has a short wheelbase or long wheelbase option. At the beginning of the project, I had chosen to go with the long wheelbase option, as it would mean more space for internals. Another reason for that choice was that the 3x11 panel fit very well as the bodywork on the side. Now, with the 3x7 panel, doing a good looking short wheelbase version would also be possible. The reason that I could not simply use 3 technic beams stacked on top of each other instead of this panel was that the guide axle from the door slides into the middle hole of the 3x panel when the door slides back. One possible solution would be to have a bunch of vertical 3 long beams side by side, but I did not think that this would look very good.
Knowing how tightly packed the long wheelbase version was, I knew that I could not fit all the same features into a shorter package. The obvious thing to drop was the button driving feature, which would save a lot of space and complexity. Also, I decided to do the lower half of the body in black instead of dark bluish grey, due to better part availability.
Finally, here are the pictures:
You can see a video of it in action here:
Technical details:
Tow tractor, long wheelbase:
- Length: 38 studs
- Width: 15 studs
- Height: 20 studs
- Weight: 1.2 kg
- Power functions
- XL motor for drive
- M motor and PF switch for button driving
- Servo motor for steering
- IR receiver for driving and steering
- AA battery box
Tow tractor, short wheelbase:- Length: 34 studs
- Width: 15 studs
- Height: 20 studs
- Weight: 1.1 kg
- Power functions
- XL motor for drive
- Servo motor for steering
- IR receiver for driving and steering
- AA battery box
Luggage cart:
- Length: 33 studs with tow bar folded up
- Width: 17 studs
- Height: 16 studs
- Empty weight: 360 grams
- Weight with luggage: 900 grams


Hello, I wanted to ask if you happen to have instructions for this model?
ReplyDeleteThanks for your interest, but unfortunately, I do not have instructions for it. I do not plan to make full instructions for it, but if you are interested, I could provide you with some detailed pictures that you could probably build it with some reverse engineering.
Delete